
These 4 videos will help you setup your OrCam Read Smart.
We recommend going through these video tutorials in the order presented, so you can learn to use your device as easily and quickly as possible. Start here with 'Setup' and continue to 'Reading', then 'Vocal Commands' and so on. You will find at the end of each section the link to the next recommended video tutorials.
Jump to Setup Video 1: Unboxing
Jump to Setup Video 2: Parts and Buttons
Jump to Setup Video 3: Charging, Powering on and Shutting Down
Jump to Setup Video 4: Connecting to Bluetooth
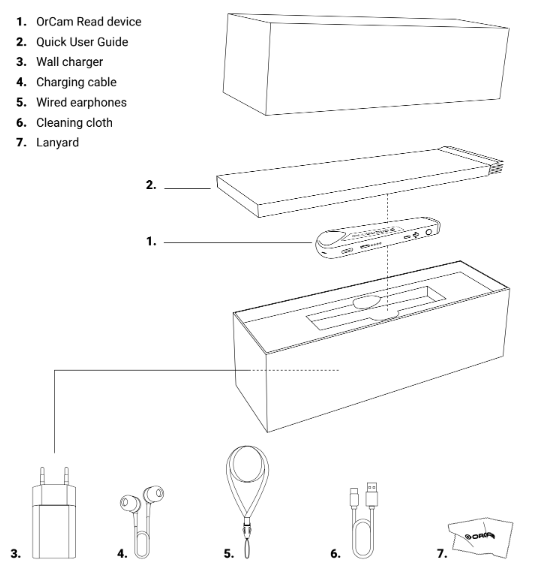
Setup Video 1: Unboxing
To get the video tutorial to play, click on the video image below.
Below is an image that visually shows as a line drawing all the items that come in the Read box.
Video 2: Parts and Buttons
To get the video tutorial to play, click on the video image below.
Additional helpful information:
- SPEAKER: The speaker is on the bottom side of the device, near the audio outlet.
- LED ON/OFF LIGHT: This is the small circular light next to the speaker, moving in the direction of the camera. When the device is shut down, and then powered on, this light will turn orange and then blue.
- TRIGGER BUTTON: The round button near the camera that is used to perform most of the functions.
- POWER BUTTON: The narrow rectangular button between the four LED lights and the charging outlet that is used to power the device on and off as well as to enter the setting menu.
Setup Video 3: Charging, Powering On and Shutting Down
To get the video tutorial to play, click on the video image below.
Additional helpful tips:
- SUSPEND MODE: You can enter this mode when the device is on, and it will allow you to save battery life without shutting the device down completely. Press on the power button once to enter suspend mode.
- POWERING ON FROM SUSPEND MODE: Press and hold the power button until you hear a beep, then lift you finger. The LED lights next to power button will light up, while the on/off LED on the underside of the long side will not. The device will immediately be ready to use.
- POWERING ON FROM SHUT DOWN MODE: Press and hold the power button until you hear a beep, then lift your finger. The on/off LED light will light up immediately, first orange and then blue. It will take about 20-30 seconds for the LED lights next to the power button to light up and for the device to power on fully.
The device will automatically enter the SUSPEND mode after 3 minutes of inactivity. This timeframe can be adjusted in the settings menu.
If this is something you would like to change, read the tips below and click here for instructions on how to enter and use the settings menu.
- You will find the option to change this timeframe in the 'General Settings Menu' which is the seventh option in the settings menu.
- Once you select 'General Settings Menu' the third option allows you to change the automatic suspend time.
After 3 hours in SUSPEND mode it will automatically POWER OFF.
There are four LED lights next to the power button that indicate the battery status. Each lights represents 25% of the full charge. For example, four lights means the battery is between 75% - 100% charged.
Setup Video 4: Connecting to Bluetooth
This is the same video that appears in the connectivity video tutorial section. To get the video tutorial to play, click on the video image below.
TO ENTER THE SETTINGS/SET UP MENU:
- Press and hold the power button, while you press the '+' button, and then release both. You will hear the device announce, 'Main menu, to set reading rate.....'.
- Use the '+' button to move through the menu options. The connectivity settings menu is the 6th option.
- Follow the device instructions.
Up next: Reading Video Tutorials for OrCam Read Smart