These tips will help you get started with using your device for reading.
We recommend going through the tutorials in the order presented, so you can learn to use your device as easily and quickly as possible. Start with 'Setup' and continue here with 'Reading', then 'Vocal commands and smart reading' and so on. You will find at the end of each section the link to the next recommended video tutorials.
There are 2 methods of reading with the OrCam Read 3:
- Reading with the trigger button, covered in this section.
- Smart reading, covered in the next section (because it requires an understanding of vocal commands first).
Reading basics
Reading with the OrCam Read 3 is a straightforward process that involves pointing and clicking. However, to ensure the best possible reading experience, it's important to be aware of certain details and nuances. This will help you make the most out of the device and enhance your overall reading quality.
When you're getting ready to read with the device, follow the steps below:
- Make sure that there's enough light where you are (if there isn't, the device will say 'Light level too low');
- Make sure that there are no shadows on the text, if possible (if there is one, it won't be critical but can make it a bit harder for the device to read);
- Point with the device to the text that you'd like to read at a distance of about 12 inches or 30 centimeters;
- Check that the device is looking straight at the text (ideally they're at 90 degrees to each other);
- Hold down the trigger button (the round one in the front), you will see some laser;
- Adjust depending on text layout and laser mode that the device is currently set to (see more information below);
- Keeping your hand and the text steady, release the trigger button after adjusting and waiting for 2 full seconds;
- You will hear the shutter sound of a picture being taken by the device;
- The device should start reading, and you can relax, put the device down and listen in.
Laser modes
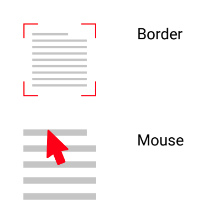
There are two laser modes that are designed to help you focus your OrCam Read 3 on any desired text. The border/frame mode and the mouse/arrow mode:

The device comes with the mouse/arrow laser by default. You can switch between the two by pressing the ('+') and ('-') buttons at the same time.
The option you select is based on exactly what you would like to capture. With practice, you will soon become familiar which option is best at which time.
TIPS:
- No matter which laser mode you use, hold the trigger button down for at least 2 seconds. Once you release the trigger button, you will hear the shutter sound of the camera taking a picture and then several beeps as the device processes to information. You can move your hand as soon as you have heard the shutter sound.
- When you are selecting a specific area, hold steady and count 'one, two' before you release the trigger button. This is to be ensure best results and that a quality picture will be taken.
BORDER/FRAME LASER:
We recommend practicing with the border/frame laser option first. This is great to read 2 pages of a book at a time or half a newspaper page, or you can select smaller specific sections of text within the frame.
- The device will start reading from a line or two above the frame.
- To read a single page of text in portrait mode simply align the page within 3 sides of the laser border. You can have the laser hanging over the edge of the page, and the device will still read the text within it.
MOUSE/ARROW LASER:
This mode is great for reading specific blocks of text. Center the arrow in the middle of the block of text for best results. The device will start reading from the beginning of that specific block of text and not from the word pointed at.
The device sees a page of a book as a block of text. To capture a page of a book with the mouse/arrow, center it in the middle of the page.
This mode is great for small text, like business cards, labels, text messages on your phone, to read text off your computer or smartphone, individual columns in a newspaper or selecting specific blocks of text in a magazine.
Switching between laser modes
To switch from one laser mode to other, you can do one of the following:
- Give the device a vocal command. Simply say, 'Hey OrCam, change the laser' and give the device 2-3 seconds to respond. You should then hear a chime sound, and the device will confirm that it's changed to the other laser mode.
- Press the plus(“+”) and minus (“-”) volume buttons on the device together, once.
Reading navigation
Easily navigate any text while reading.
• To pause or resume reading, press the trigger button twice, very quickly.
• To skip to the next sentence, press on the plus (“+”) volume button once.
• To go back to the previous sentence, press on the minus (“-”) volume button once.
• To stop reading, press the trigger button once.
OrCam Read 3 will make a chime sound when finished reading.
Up next: Vocal commands and smart reading
Previous: Setup Video Tutorials for OrCam Read 3
